Tips & Tricks: Indexes
For those of you who write non-fiction, an important element of your book is the index. One of the most surprising things about traditional publishers is that they don’t necessarily provide one—although they often require one. If so, make sure that you understand what they expect from you before you sign your contract. Are you supposed to generate a list of key words? The whole index? Are you responsible for paying a professional indexer to create one for you?
There are differing opinions about how important an index is to the success of a book. Many subsidy or self-published authors, when faced with additional costs, make the decision to not include one with memoirs or biographies. If you are writing a book for your family or for a tiny audience, that might be okay. However, as authors who write for military audiences and/or historians, most of us have noticed at signings how veterans pick up a book and turn immediately to the back to see if this piece mentions his or her unit. If you write about specific locations, your customers might be checking to see if they recognize businesses or local personalities. If you mention certain battles, they might be looking for specific locations or events. Sometimes people are looking to see if you included their names in your book—or the names of people they know.
An index points to your professionalism and enhances your credibility. It also makes your book attractive to libraries, archives, and museums. Researchers will appreciate that you have made your book easier to use. Serious readers will note the quality of your work. At MWSA, we do not reduce your score if you don’t have one for a non-fiction book, but we do give you a bonus point if you do...which of course, can make a difference if there’s a tie in all the other areas of quality that we evaluate and measure in the awards program.
If you are concerned about indexing and prefer to have one professionally generated, you can find someone at the American Society of Indexers. (http://www.asindexing.org)
If you prefer to create one yourself, you can do it in MsWord. (Examples are for Word 2010. Other versions might have slightly different menu choices.) As author, you know your material better than anyone else. However, you will need to do some serious strategizing. The first thing you need to do is identify your audience. Are you aiming at veterans? Historians? General audience? Each of these audiences will require a different indexing approach. For example, a general audience is more likely to be looking for broad information. Historians will want more detail pertaining to events, participants, and outcome. Technical readers want specificity. Your vocabulary and presentation will already be directed toward the readers you are courting so this is information that you have already considered.

The second step is to create a list of words that you think your readers might need. For example, if you have written a memoir and are aiming at a general audience, you might include the names of people, cities, companies, etc. You could even consider adding important events of public note. However, if you are focusing on a military readership, you might also include operational terminology and rank or unit information. You might even want to arrange these words into a rational hierarchy—under “weapons,” you might have a subset of rockets, rifles, and sabers. Once you have your list,
- Alphabetize it.
- Create a separate file from your manuscript and name it something like “index.docx.”
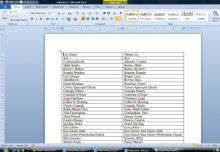
- In this file, create a two column table.
- In the left column, place the word or phrase that you have identified as a keyword.
- In the right column, place how you would like to see it appear in the index. For example, if your key word is “John Brown,” you might want it to appear in the index as “Brown, John” or “Brown, John LTCOL USMC.”
- If you have subcategories, you would indicate this in the right column as well. Example, if your keyword is “daffodil,” you would put “Flowers: Daffodil.” You’d do the same with “Flowers: Poppy” and “Flowers: Tulip.” In your completed index, the information would appear as:
Flowers
Daffodil, 2
Poppy, 5
Tulip, 9
- When you complete your table, save the file.
- Open your manuscript file and navigate to the page where you want your index to appear and click on the location on the page.
- On the command ribbon, select “References.”
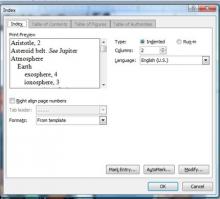
- On the “Index” section, select “Insert Index.”
- A box will appear. Under the “Index Tab,” select a format from the “Format” dropdown menu.
- Then select “Automark.”
- From your hard drive, choose the file that you just created with your table of keywords.
- The program will then go through your table of keywords, marking them in the manuscript, and generating your index.
- After your index has been created, you will see all kinds of odd marks and fields in your copy. Go to “File,” “Options,” “Display,” and deselect “Show all formatting marks.”
At this point, you can go through your index, making sure that it appears as you planned. If not, you can make edits in your table and try again.
You can also mark your manuscript manually, however, it’s much easier to use the concordance table.


